Atlantis Solar


Tel: 916-226-9183 | Save Paper Use PDF: | Email: sales@atlantissolar.com
®
Every one is plugging in! “Go Green”
®


Every one is plugging in ! ®
Copyright 2003-2019 © Atlantis Solar®, All rights reserved.
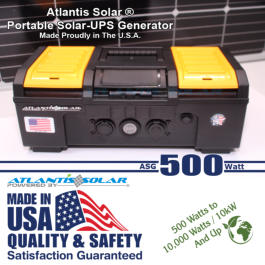
Atlantis Solar® Upgradable "Plug & Play"
Portable Solar - UPS Generators “Built To Last”
~ 2018 - 19 Now In Stock 12V / 24V / 48V starting at 500 watts up to 10kW and more depending on order ~
On and Off Grid Pure Sine Inverters with High Amp Solar Charge Controllers including High Amp AC to DC Charging.
Our solar generators will provide a solution for every person worldwide ranging from our smaller upgradable size solar
generator - UPS units to our largest upgradeable generators.
Atlantis Solar ® is making it more affordable to provide electricity to any remote location in the world, no matter where you live.
These solar generators will offer peace of mind knowing you have security in your home. business, disaster relief or any where
you would rely on electricity 365 days per year 24 hours per day.
Ranging from our small affordable generators giving you lights, security and cooler inside air to your home, business or other
applications, to our large generators that will operate several large energy needs without having to worry about energy supply
or large monthly energy bills.
No more monthly high electrical bills or power outages no matter where you live.
Updating our “NEW” State Of The Art Solar Generator Technology
Made In America Solar Generators - UPS units

We manufacture all size portable generators only in America

The only "SMART" High AMP Solar / UPS Generators in the world designed and made in the U.S.A by Atlantis Solar ®
Atlantis Solar and Wind LLC USA - Atlantis Solar Jordan Middle East
All Atlantis Solar ® portable solar generators begin at the below sizes and can be built to any size required on custom special orders.
Battery caddy's including other model solar generator designs will be available by November 10th, 2018.
100% Environmentally Friendly Plug-N-Play Carbon Free Atlantis Solar Portable Made To Last Solar Generators - UPS
Come Join Our Environmental Movement!!!
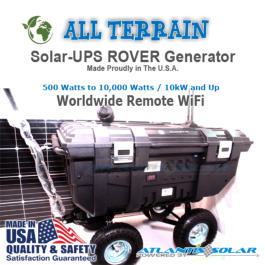
- The generator you see in my photos is exactly what you will receive minus the antennas and night vision wifi camera (sold separately)
- This Generator is Made In America by Atlantis Solar ® in Tallahassee FL
What comes with this ROVER "Package" is listed below including a separate battery caddy to hold your batteries up to 1,000lb/1,200lb capacity.
* ROVER Solar Generator dimensions including wheels L 34" x H 25" x W 21" not including 28" detachable tow bar with removable handle
* ROVER Solar Generator battery caddy dimensions including wheels L 34" x H 25" x W 21" not including 28" detachable tow bar with
removable handle
* ROVER Solar Generator battery caddy holds up to 12vx4x125ah AGM Deep Cycle No Maintenance High Quality Batteries
1. This ROVER includes 2 AGM Deep Cycle No Maintenance High Quality Batteries 12 volt~125 amps per battery totaling when fully charged
3,000 watts that will be drop shipped by our USA battery supplier separately from your Solar Generator - UPS System that will be shipped
from us directly to you. Each battery weighs approximately 75lbs.
2. You will receive drop shipped 1kW of AA Mono Crystalline USA made solar panels directly from our Atlantis Solar ® solar panel supplier.
3. Your system will be 100% plug and play and you can increase batteries and solar panels if you choose.
4. I personally used this exact system during Hurricane Michael when the power was out for 5 days, and it was truly amazing in helping make
it until electricity was stored.
5. Please read further details below that provide much more details of what comes built with in your new Solar Generator - UPS including the
added accessories we can add for you.
6. Warranty on your portable Solar Generator - UPS is one year parts for natural failure only. All personal modifications or changes that would
effect the operation of your Solar Generator by Atlantis Solar ® will void all and any warranties. Please contact us before being creative; we
can help if needed. Our Solar Generators are built by hand in sophisticated detail for future add-ons.
7. Warranty for solar panels are 25 year life factory direct.
8. Warranty on all AGM Deep Cycle No Maintenance Batteries are 2 years for natural failure. Our batteries have lasted up to 10 years plus with
military with 100% success....
We are here 100% to please you with high quality products at affordable prices; not rinky dink poor quality products.
This Solar Generator - UPS system is being used in Disaster Relief including our smaller and larger portable units in America and many countries
abroad with 100% satisfaction.
Details of this Solar Generator By Atlantis Solar ® :
Please review attached photos of our new Atlantis Solar ® Smart Solar Generators
* All Atlantis Solar ® portable solar generators begin at the below sizes and can be built to any size required on custom special orders. Battery
caddy's. Other model solar generators will be listed soon..
* 500w surge 1000w loaded with a 10ah to 80ah agm no maintenance deep cycle battery AC/DC 5V/12V/110v/220v -50~60hZ
* 1000w surge 2000w loaded with a 100ah to 125ah agm no maintenance deep cycle battery AC/DC 5V/12V/110v/220v -50~60hZ
* 2000w surge 4000w loaded with a 125ah to 175ah agm no maintenance deep cycle battery AC/DC 5V/12V/110v/220v -50~60hZ
* 3000w surge 6000w loaded with a 250ah to 400ah agm no maintenance deep cycle battery AC/DC 5V/12V/110v/220v -50~60hZ
* 4000w surge 2000w loaded with a 300ah to 500ah agm no maintenance deep cycle battery AC/DC 5V/12V/110v/220v -50~60hZ
* 5000w surge 10000w loaded with a 400ah to 600ah agm no maintenance deep cycle battery AC/DC 5V/12V/110v/220v -50~60hZ
* 6000w surge 12000w loaded with a 500ah to 700ah agm no maintenance deep cycle battery AC/DC 5V/12V/110v/220v -50~60hZ
* 8000w surge 16000w loaded with a 600ah to 700ah agm no maintenance deep cycle battery AC/DC 5V/12V/110v/220v -50~60hZ
* 10000w surge 20000w loaded with a 600ah to 800ah agm no maintenance deep cycle battery AC/DC 5V/12V/110v/220v -50~60hZ
Custom built special orders, just ask....
All units from 500w up to 2kW will be priced accordingly based on the type of inverters "Modified Sine or Pure Sine"
From 2.5kW up will only have 100% "PURE SINE" with a 220V 50hZ~60hZ 40/50ah outlet for junction easy connect for home or business.
Atlantis Solar ® portable solar generators systems beginning with 500w to any size will include the following:
* All terrain Atlantis Solar ® portable solar generators systems
* International universal AC outlets
* DC outlets USB - Circular light lights - Cigarette
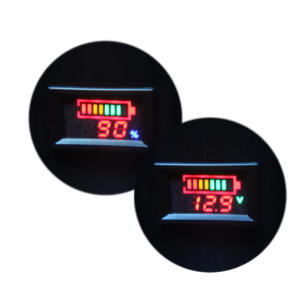
* Easy to read battery strength indicator light in both volts and percentage readings
* Led bright high beam lumens wide area built in auto style 2 per 500w to 2000w / 4 per 2500 to 10,000w and up
* 2kW's and up will have 24/7 DC led panel lights or light for night time vision
* 2.5kW's and up include internally separate from what comes with the inverter high circulation fans for cooling, energy efficiency, longer life from
over heating
* A solar charge controller appropriate based on the amount of batteries supplied for fast DC charging
* AA solar panel or panels mono crystalline factory direct
* DC- All Atlantis Solar ® portable solar generators start with 2 USB 5v rapid charge up to 4, 6, 8 USB ports depending on demand or size of
generator
* DC- All Atlantis Solar ® portable solar generators start with 1 Cigarette outlet 12v charge up to 4, 6, 8 Cigarette outlets depending on demand or
size of generator
* DC- All Atlantis Solar ® portable solar generators start with 3 Power outlets 12v charge up to 4, 6, 8 Power outlets depending on demand or
size of generator
* DC- All Atlantis Solar ® portable solar generators start with 3 Power outlets 12v charge up to 4, 6, 8 Power outlets depending on demand or
size of generator
* DC- On/Off switches for DC power control panel, DC Super Bright White LED Lights
* Auto operate on/off high velocity intake cooling fan starting at 35°C/95°F including 2 to 4 internal thermal inverter cooling fans
* All Atlantis Solar ® portable solar generators include exit exhaust providing better air circulation
* DC- MC4 cable with jacks to connect solar panels IP67 waterproof and dust proof safe electrical connection
* DC- 150ah auto/manual solar panel quick connect and disconnect safety switching
* DC- Interior exterior battery all terrain 1000lb to 1200lb "ROVER" caddy quick connect battery terminals to add extra batteries in minutes for
longer operation backup
* AC to DC UPS Style rapid battery charger stabilizer 110v/220v ~ 50hZ/60hZ
*AC Universal Outlets 110v to 220v + 15ah to 30ah direct connect with solar generator outlets starting at 2 to 4 outlets and up
* AC Universal Outlets hardwired direct to the inverter 110v to 220v + 40ah ~ 50ah solar generator outlets starting at 2/500w to 2000w and 4
to 6/2500w up
* DC battery array to AC 2.5kW up includes a 250ah DC inline manual/auto quick disconnect for safety including complete system shut down
* AC energy monitoring LCD panel, watts, amps, volts, usage
* AC high velocity intake circulation cooling fan including an appropriate sized engineered exit vent for better efficient circulation and cooling
*AC inverter on/off switch (Remote Extra)
* AC/DC universal added auto on/off power switch (Worldwide Wifi Extra)
* Most units come with spare storage to hold extra bells and whistles, a nice added feature for instructions or accessories
Standard Features including accessories are unlimited:
* Custom design made with heavy-duty polyethylene that resists chips, rust and dents for long lasting durability
* Heavy duty mobility all terrain frame and wheels for portability on 2.5kW and up
* Guaranteed corrosion and weatherproof for long life
* Ready to use all in one portable station without needing a rocket scientist to set up, just plug in turn on and you are ready to play
* Can be moved from location to location with ease of transport and immediate operation
* Versatile applications from home to emergency relief, disaster relief, off grid use, any application that requires pure energy worldwide
* Upgradable by adding extra batteries and or solar panels
* USB Outlets
* Cigarette lighter style outlets
* 110/220~50hZ/60hZ International outlets
* 12V DC Power outlets for lights and much more including AC/DC operation equally at the same synchronized time
* DC Battery Level LED Indicator helping keep track of battery levels
* AC Panel providing energy usage real time per kW hour, daily, weekly, monthly (2.5kW and Up)
* Auto control High Grade Circulation Fan keeping all inner components from over heat loads due to hot ambient temperatures (2.5kW and UP)
* Inverters provide added smart surge protection including 2 to 4 inner cooling fans on all solar generators 500w and up
* All terrain all weather 1,000lb inflated tires for easy transport with a metal frame under carriage easy Plug-N-Play (2.5kW ROVER and up)
* All terrain all weather long lasting anti corrosion 1,000lb to 1,200lb enclosed battery caddy easy Plug-N-Play (2.5kW ROVER and up)
* DC voltage/battery level LED indicator with all units
* All units are 100% highly secure and definitely built to last over any portable solar generator-UPS in the world 20+ years Building followed by
outstanding QC (PROUDLY MADE IN AMERICA)
* Energy and Mobility easier then ever, Plug-N-Play, 100% Environmental and User Friendly
* All units have built in 9V dual high lumens bright LED wide area lighting with on/off switching for safety and security
* All DC panels light up for 24/7 access
* All units have MC4 connectors to easily connect solar panels / solar arrays (standard for solar)
* 50 Foot of High Quality MC4 Cable Included with all Solar Generators 2.5kW and up
* 25 Foot of High Quality MC4 Cable Included with all Solar Generators 500w and up to 2.5kW
All solar generators are easily upgradeable and will definitely last for many years to come
* Extra Features / accessories not included sold separately:
* 2.5kW and up a 220v~50hZ/60hZ outlet with a dual female insulated junction box easy connect 40~50ah
* Hybrid automobile easy connect mobile charger
* Voice activated Atlantis Solar ® portable solar generators worldwide for AC/DC hands free operation
* Smart phone, tablet, or personal pc activation worldwide
* Smart phone, tablet, or personal pc remote camera with voice activation worldwide 24/7
* Remote command for all independent outlets AC/DC
* Command Homes, Offices, Camps, Emergency, Drones, virtually anything from thousands of miles away with automatic wifi charge stations
* All terrain heavy duty 6 to 8 battery load of 1200 lbs all weather quick connect battery caddy with MC4 and UPS charging, including a battery
usage indicator
* Interchangeable to large more all terrain wheels and tires
We can manufacture portable generators to your special needs "JUST ASK"
* Options are unlimited with many features, user friendly, environmentally friendly and 100% heavy duty long lasting with simple plug - n - play.
plug - n - play.


12V/110V/220V - 50~60hZ


“HOT ITEMS”